


In this Unity particle system tutorial i will show you, how to create circles with code using the unity shuriken particle system. I’m using C# so be prepared for this!
Why use code for a Unity Particle System?
If you have read my other Unity Particle System Tutorial: Circle Motion you might have noticed doing all that stuff by hand can take some minutes. Also you need to calculate every point beforehand.
The cool thing about using code is you can use a frequency(a repeatrate) and even a amplitude (the value height -1.0f,1.0f). So you can easy enter a frequency of 100 so you will 100 cicles without touching the curves by hand which saves alot time. also you could increment amplitude over time or change to your needs to create tornados or other shapes. So accuracy and usability are the most important key features in terms of coding, which you might not be able to provide by hand.
Unity Particle System Tutorial: The Circle
Create a particle system, i believe you don’t need me to explain how.
Create a C# Script and name it whatever you like, naming convention is king 😉
PS_CircleMotion.CS could be a name you can name it. PS stands for Particle System.
Open the script using Monodevelop or any other you prefer to work with.
Let’s create some variables we need later
public int frequency = 2;//repeatrate
public float resolution = 20;//the amount of keys used to create the curves
public float amplitude = 1.0f;// the height of the values(-1.0f,1.0f)
public float Zvalue = 0f;//Easy access for Helix creating later
Now we create a new function for our curves and particle system.
void CreateCircle()
{

}
In here we create a connection to our unity particle system and the curves we want to change by code, which in our case is velocity over lifetime.
ParticleSystem PS = GetComponent<ParticleSystem>();//connect to the particle system
var vel = PS.velocityOverLifetime;//connect to the velocity over lifetime curves
vel.enabled = true;//enable the velocity over lifetime if it hasn't
vel.space = ParticleSystemSimulationSpace.Local;//set the particle space to local
Also we want to set the speed to 0 and the Z-Axis not to be affected. So we add:
PS.startSpeed = 0f;//set the speed to 0
vel.z = new ParticleSystem.MinMaxCurve(10.0f, Zvalue); //set the Z-Axis value
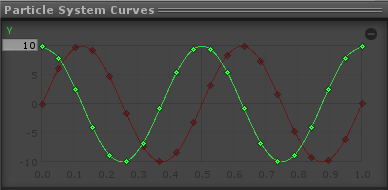
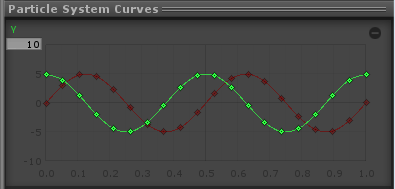
Now we create a new Curve for the X-Axis by code. This curve is going to be a sine wave so we need a bit math to calculate it. Also we use a for loop to go through all points so we can easy automate the calculation of all points depending on the resolution we used.
AnimationCurve curveX = new AnimationCurve();//create a new curve
for (int i = 0; i < resolution; i++)//loop though the amount of resolution
{
     float newtime = (i/(resolution-1));calculate the time where the point is set
     float myvalue = Mathf.Sin(newtime * 2 * Mathf.PI);//depending on the time calculate the value of the point

     curveX.AddKey(newtime,myvalue);//add the calculated point to the curve
}
vel.x = new ParticleSystem.MinMaxCurve(10.0f, curveX) //now create the actual curve (10.0f is the value multiplier)
Almost the same applies for the Cosine wave we need for the Y-Axis
AnimationCurve curveY = new AnimationCurve();
for (int i = 0; i < resolution; i++)
{
   float newtime = (i/(resolution-1));
   float myvalue = Mathf.Cos(newtime * 2 * Mathf.PI);

   curveY.AddKey(newtime,myvalue);
}
vel.y = new ParticleSystem.MinMaxCurve(10.0f, curveY);
Now let’s start the function in start.
void Start()
{
     createCircle();
}
Unity Particle System Tutorial: First Test
Save the Script!
Drag the script on your earlier particle system, and disable shape, so you only have a stream of particles.
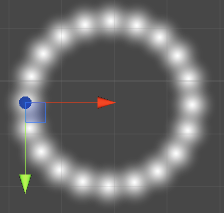
Press play! Looks good ? 😀
But wait!!
Unity Particle System Tutorial: The Frequency
We havn’t use frequency. Now we need to think about how a sine or cosine wave works. Or that the math?
So the math was we create the sine wave depending on the time(x) we create a point, and the amount of the rotation. In this formula i used a full circle calculation (2*PI).
float newtime = (i/(resolution-1));
float myvalue = Mathf.Sin(newtime * 2 * Mathf.PI);
So when our frequency is 1 nothing should change but if we would change it to 2 we would need to double the rotation amount of the circle. So the calculation needs to be (4*PI). The easiest way to automate frequency is ((frequency * 2) * PI) So we can change our code to it.
float newtime = (i/(resolution-1));
float myvalue = Mathf.Sin(newtime * (frequency * 2) * Mathf.PI);
Same goes for our Cosinse wave
float newtime = (i/(resolution-1));
float myvalue = Mathf.Cos(newtime * (frequency * 2) * Mathf.PI);
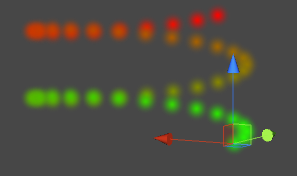
Now you can change the frequency to any value you like, for multiple cicles. But why? For a Helix!
If you change Z-Axis value now to 1 and frequency to 2 you can see a Helix! 😀
Important: If you increase frequency, also increase the resolution!
You could even automate it, by some code too. The problem is, you might overdo it, even if it’s not needed.
Unity Particle System Tutorial: The Amplitude
Now we might want only the half power in our curve, thats where the amplitude comes into play. The amplitude defines the peak height of the curve.
Amplitude of 1.0f
Amplitude of 0.5f
Handy hm? I bet it is! So lets implement that too. So how does amplitude affets the curve? The formulas are (A * sin(x)) and (A * cos(y)). Yep that easy!
So for our Sine wave it is:
float newtime = (i/(resolution-1));
float myvalue = amplitude * Mathf.Sin(newtime * (frequency * 2) * Mathf.PI);
For Cosine wave it is:
float newtime = (i/(resolution-1));
float myvalue = amplitude * Mathf.Cos(newtime * (frequency * 2) * Mathf.PI);
So what else can we do with it? With the amplitude alone we can increase the sine and cosine wave per point to create a tornado effect for example. Also when we set the Z-Axis to 0 we could create a Spiral.
Thanks for reading my Unity Particle System Tutorial.
I hope it was helpful for you in any way. If so, share it to the world!
Please Rate below!